Install The Plugin
You can install the plugin directly from your WordPress installation by following these steps:
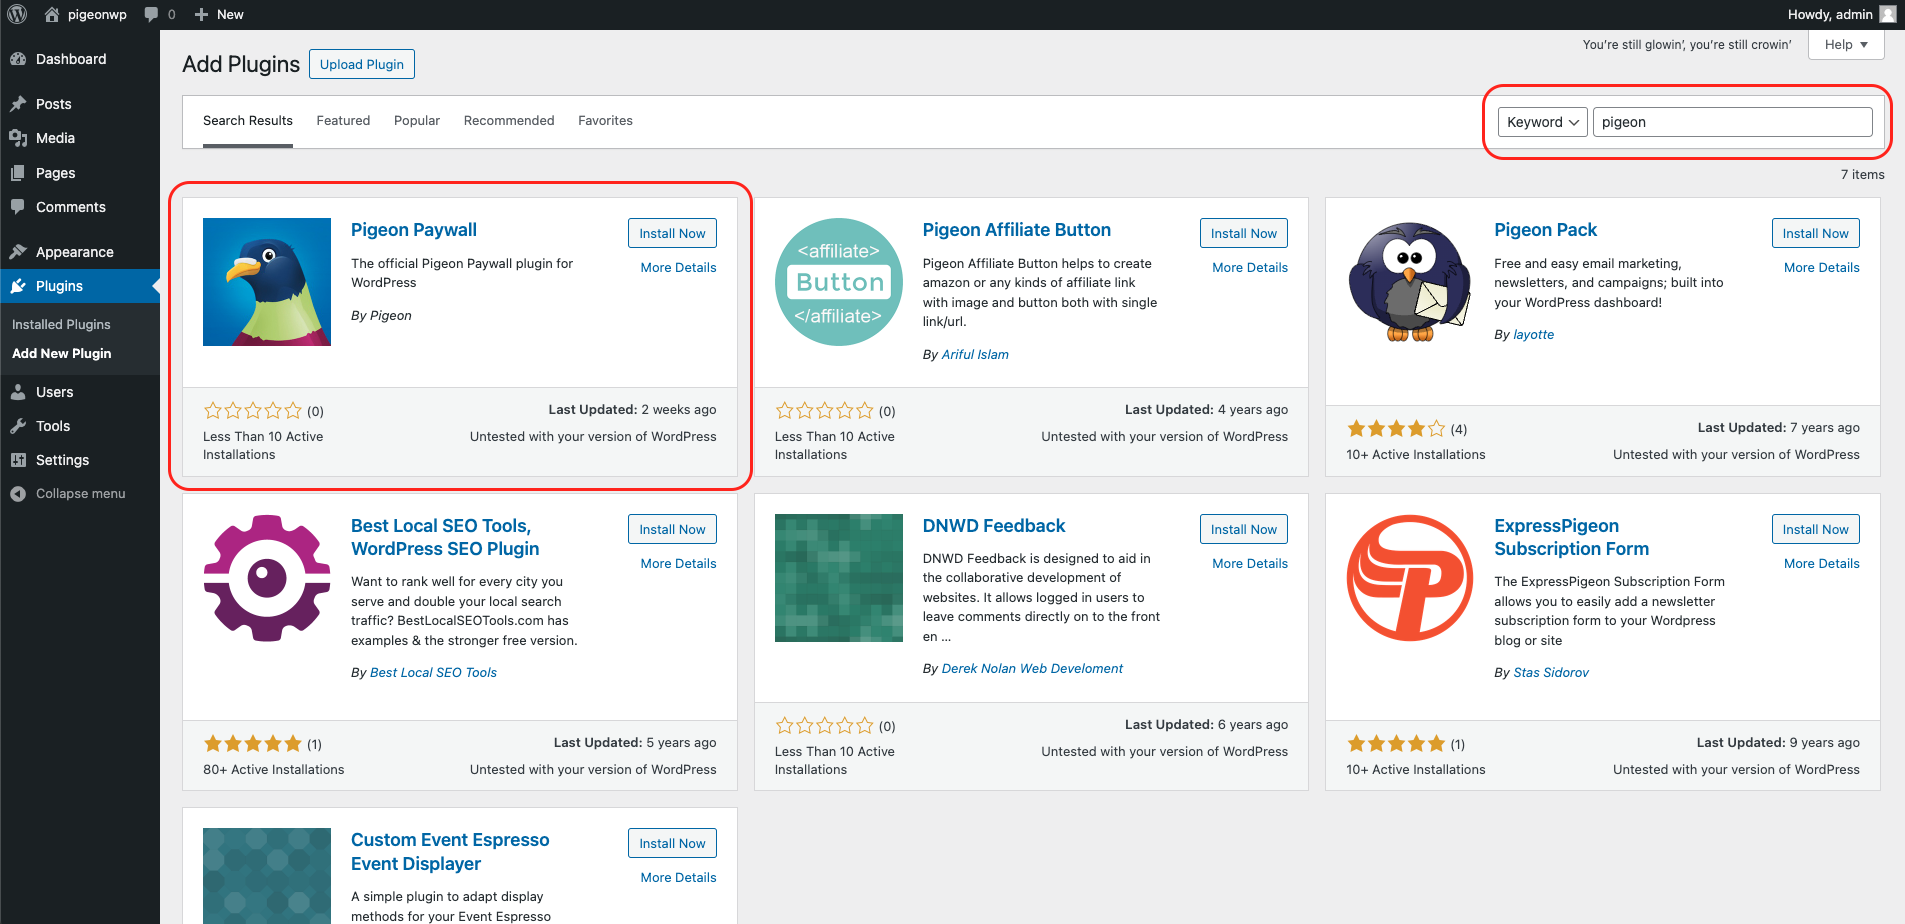
- Go to your WP Admin, hover over "Plugins" and click "Add New Plugin"
- Search for 'pigeon'
- Click 'Install Now'
- Activate the plugin
You can also download and manually install the plugin directly from the WordPress.org repository.
Plugin Settings
On the Settings > Pigeon page you need to add your supplied Pigeon Subdomain or the demo pigeon domain. Consult with a representative to determine what settings are relevant to your scenario.
Get Pigeon setting variable array with this function:
get_option( 'wp_pigeon_settings' )Advanced Customization
Add wrappers to protect your content directly into the your WordPress templates like single.php, Or use the functions.php to add your wrapper. You can have additional control using the JavaScript callbacks here.
Set Status Widget
The status widget initializes automatically Pigeon.widget.status();. You just need to add the Pigeon Status placeholder tag.
<nav id="pigeon-widget-status"></nav>Click here to learn how to further customize the pigeon widget status block.
Protect Content with functions.php
This approach allows you to wrap the content at the function level in WordPress.
Header Example
This approach allows you to style various Pigeon-related elements all from the functions.php file. Using this approach you don't have to keep track of what templates were customized. It is all in one place. The sticky status bar is used in this example.
function pigeon_header()
{
	echo "<style type=\"text/css\">
		.pigeon-widget-status { position:fixed; height: 42px; padding: 10px; width: 100%; background: #000; z-index: 999997; font-size: 14px; text-align: center; }
		.pigeon-widget-status ul { display: inline-block; margin: 0 auto; padding: 0; float: right; }
		.pigeon-widget-status ul li { float: left; list-style: none; color: #cdcdcd; }
		.pigeon-widget-status ul li a {color: #cdcdcd; border-left: 1px solid #585858; padding-left: 10px; margin-left: 13px; }
		.pigeon-widget-status ul li.meter a { border: none; }
		.pigeon-widget-status ul li a:hover { color: #bf2e2b; }
		.pigeon-widget-status ul li:first-child a { border: none; padding: 0; margin: 0; }
		.pigeon-context-promotion .pigeon-cta{ padding: 25px; text-align: center; background: #bf2e2b; color: #ffffff; margin: 25px 0; }
		.pigeon-context-promotion .pigeon-cta a{ color: white; font-weight: bold; }

		@media only screen and (max-width: 600px) {
		   .pigeon-widget-status ul { float: none; }
		}
	</style>";

	echo "<script type=\"text/javascript\">
        ;(function ($, window, document, undefined ){
            $(document).ready(function(){
				$('body').append('<nav class=\"pigeon-widget-status pigeon-widget-status-sticky\"><div class=\"pigeon-widget-status-wrap wrap\"></div></nav>');
                Pigeon.widget.status();
            });

            Pigeon.paywallPromise.done(function(response){
                if(response.profile && response.allowed){
                    // Show and hide elements based on a person being logged in and having access
                }
            });
        })(jQuery, window, document);
	</script>";
}

add_filter( 'wp_head', 'pigeon_header', 20 );
Content Wrapper Example
/**
 * @uses is_single() and is_page()
 */
function pigeon_content_filter( $content )
{
	if( is_single() || is_page() ) {
        // Wrap content with secure block and add promotional landing page.
        // Use pigeon-first-p class to remove all but the first p tag.
		$content = '<div class="pigeon-remove" style="display:none;">' . $content . '</div>';

		$content .= '<div class="pigeon-context-promotion" style="display:none;">'
                        .'<p class="pigeon-cta">'
                            .'This page is available to subscribers. <a href="#" class="pigeon-open">Click here to sign in or get access</a>.'
                        .'</p>'
                    .'</div>';
	}

	return $content;
}

add_filter( 'the_content', 'pigeon_content_filter', 20 );
Protect Content with Templates
Scenario 1 - Remove all content
This wrapper will remove all the content within the wrapper.
<div class="pigeon-remove">
	<p>All content with a class of pigeon-remove will be removed if the visitor is not authorized.</p>
	<?php get_the_content(); ?>
</div>
Scenario 2 - Remove one or more paragraphs
This wrapper will look for the first X number of paragraphs to keep, then remove the rest of the wrapped content.
Example: One paragraph kept
<div class="pigeon-remove" data-pn="1">
	<p>The content of your article. Only this paragraph will show if the visitor is not authorized.</p>
	<p>This paragraph and any subsequent content will be removed if the visitor is not authorized.</p>
	<?php get_the_content(); ?>
</div>
Example: More than one paragraph kept
<div class="pigeon-remove" data-pn="3">
	<p>Keep</p>
	<p>Keep</p>
	<p>Keep</p>
	<p>This paragraph and any subsequent content will be removed if the visitor is not authorized.</p>
	<?php get_the_content(); ?>
</div>
Promotional Wrapper
The following wrapper will show when a person does not have access. You can put your promotional copy and calls to action in there.
<div class="pigeon-context-promotion" style="display:none;">
    <?php // You could show the excerpt here if you are removing all content in Scenario 2 ?>
    <?php get_the_excerpt(); ?>
    <?php
        // This is where you can promote your content.
        // The link with a class of pigeon-open will open the pigeon modal in JS Mode
    ?>
    <p>This page is available to subscribers. <a href="#" class="pigeon-open">Click here to sign in or get access</a>.</p>
</div>